Quantcast
Channel: Cloud Security | Office 365 | Azure | SharePoint
Viewing all 72 articles
Browse latest View live

MigrationPermanentException error when migrating Google Mail (Gmail) to Office 365

$
0
0

This error (MigrationPermanentException: We had trouble signing in to this account. Please confirm that you‎’re using the correct user name and password.) can give you a real headache because the guide from Microsoft is easy to follow and things should’nt go wrong (normally). We’ve got this error for only 1 user while migrating a couple of users from Gmail to Office 365. I have read a lot of blogs saying the same thing and this is as follows:

  • Verify your .CSV file is correct with the three standard columns
  • Verify your app password

We’ve resetted the password a few times and created a new password after setting up two way auth again but this didn’t solve the problem. My issue was related to a Gmail setting that the specific user had disabled.

Solution

1. Go to the Gmail site using the users credentials

2. Go to settings

3. Click on the POP/IMAP tab

4. Enable IMAP for this mailbox
4a. it can take 1 hour before this setting is active

The post MigrationPermanentException error when migrating Google Mail (Gmail) to Office 365 appeared first on SharePoint Fire.


Editing Web Part properties with PowerShell CSOM in SharePoint

$
0
0

This PowerShell script can help when you need to change a Web Part property in SharePoint for multiple sites. We have used my script to create around 300 sites using a custom template. Certain sites were already in production when we found an issue with a certain Web Part. In stead of changing this manually I have created a script to loop through all sites and change a certain Web Part property. The script that I’ve created does the following:

  1. Loop through all subwebs from a given start point
  2. Get the specific .aspx page
  3. Get the correct Web Part
  4. Change the property

The below example will change the property of a specific Web Part on the default /SitePages/Home.aspx

Running the script

We will first start by opening the SharePoint Online Management Shell as administrator which can be downloaded at https://www.microsoft.com/en-us/download/details.aspx?id=35588.

You will need to change the first variables in the Change-WebPart function to match your Office 365 tenant and copy this bit to PowerShell.

function Change-WebPart {
	#variables that needs to be set before starting the script
	$siteURL = "https://spfire.sharepoint.com"
	$userName = "mpadmin@spfire.onmicrosoft.com"
	$webURL = "https://spfire.sharepoint.com"
	$relativePageUrl = "/SitePages/Home.aspx"
  
	# Let the user fill in their password in the PowerShell window
	$password = Read-Host "Please enter the password for $($userName)" -AsSecureString</pre>
	# set SharePoint Online credentials
	$SPOCredentials = New-Object Microsoft.SharePoint.Client.SharePointOnlineCredentials($userName, $password)

	# Creating client context object
	$context = New-Object Microsoft.SharePoint.Client.ClientContext($webURL)
	$context.credentials = $SPOCredentials

	#get Page file
	$page = $context.web.getFileByServerRelativeUrl($relativePageUrl)
	$context.load($page)

	#send the request containing all operations to the server
	try{
		$context.executeQuery()
	}
	catch{
		write-host "Error: $($_.Exception.Message)" -foregroundcolor red
	}

	#use the WebPartManger to load the webparts on a certain page
	$webPartManager = $page.GetLimitedWebPartManager([System.Web.UI.WebControls.WebParts.PersonalizationScope]::Shared)
	$context.load($webPartManager.webparts)

	#send the request containing all operations to the server
	try{
		$context.executeQuery()
	}
	catch{
		write-host "Error: $($_.Exception.Message)" -foregroundcolor red
	}

	#loop through all WebParts to get the correct one and change its property
	foreach($webPartDefinition in $webpartmanager.webparts){
		$context.Load($webPartDefinition.WebPart.Properties)

		#send the request containing all operations to the server
		try{
			$context.executeQuery()
		}
		catch{
			write-host "Error: $($_.Exception.Message)" -foregroundcolor red
		}

		#Only change the webpart with a certain title
		if ($webPartDefinition.WebPart.Properties.FieldValues.Title -eq "Documents")
		{
			$webPartDefinition.webpart.properties["Title"] = "My Documents"
			$webPartDefinition.SaveWebPartChanges()
		}
	}
}
Change-WebPart

image

First enter your password and press enter (I didn’t add output on this script so trust me that I didn’t had any errors 🙂 )

The above script has changed

image

To

image

This script is not very useful when changing only 1 web part but image you need to change a certain web part on 200 project sites because of a template update or mistake. This way you can update all your project sites matching the changes you have made in the template regarding web parts.

The post Editing Web Part properties with PowerShell CSOM in SharePoint appeared first on SharePoint Fire.

Hide / Disable Export to Spreadsheet

$
0
0

I got a question from a colleague where the customer has added an out of the box survey in SharePoint and granted the required users permissions to respond. The scenario has been recreated on my environment and the issue is that visitors/members can read other responses even when specified that they are not allowed to view them using the Export to Spreadsheet action. This occurs in all SharePoint environments and I’ve created the scenario in SharePoint Online (Office 365). I would like to suggest using the Office 365 Forms app to build a survey when using Office 365!

I responded to a survey with my “External” account with edit permissions:

image

I changed the edit permissions to read and navigated to the “Overview” page.

image

I still have actions available and also Export to Spreadsheet

image

I was able to see all answers from all users.

Solution

There is no option to really disable this functionality but we are able to hide the Actions tab.

You can hide the Actions tab using CSS or JQuery. I suggest to do the below actions on all .aspx pages used by the form although Overview.aspx is the one hosting the “Export to Spreadsheet” :

  • Overview.aspx
  • AllItems.aspx
  • Summary.aspx

CSS

SNAGHTMLde51c4c

Edit page

image

Add a Script Editor web part

image

Edit snippit and add the below CSS code. This will select all ID’s that contains _ListActionsMenu_t and hides it.

<style>
*[id*=’_ListActionsMenu_t’]{ display:none; }
</style>

image

Insert and stop editing the page

image

The Actions menu is now hidden.

JQuery

I suggest using CSS and JQuery combined in case the browser does not support the wildcard selection from CSS.
Add the below code in the same script editor webpart where you can add this also as a .js file to the site assets and reference those .js files.

<script src=”//code.jquery.com/jquery-3.1.1.min.js”></script>
<script>
$(document).ready(function(){
$(“table.ms-menutoolbar tr td.ms-toolbar”).has(“span[id*=’ListActionsMenu_t’]”).hide();
$(“table.ms-menutoolbar tr td.ms-separator:first”).hide();
});
</script>

image

Insert and stop editing the page

image

The post Hide / Disable Export to Spreadsheet appeared first on SharePoint Fire.

SharePoint Online site provisioning using Microsoft Flow, Azure Functions and Azure Storage Queue

$
0
0

A while back I created a provider hosted app using CSOM in C# for creating project sites but this required the users to have sufficient permissions to create a site. Using Microsoft Flow, Azure Function, Azure Storage Queue, PowerShell and SharePoint Online I created a proof of concept with the latest techniques and using the AppId/AppSecret so the user doesn’t need additional permissions. This solution isn’t free as it needs an Azure Subscription but the costs are minimal. Please find references to Microsoft in the summary at the end.

This article describes the following scenario:

  1. The user creates an item in a SharePoint list.
  2. Microsoft Flow will be triggered on item creation.
  3. Microsoft Flow will add a message on the Azure Storage Queue.
  4. The Azure Function will monitor the Azure Storage Queue and create the subsite based on the values entered in the SharePoint list using PowerShell.

This article has the following chapters:

  • Create SharePoint List
  • Get and register AppId and AppSecret in SharePoint Online
  • Create Azure Storage Queue
  • Create Azure Function
  • Create PowerShell Script
  • Test Azure Storage Queue
  • Create Microsoft Flow

Create SharePoint List

First we are going to create a list in SharePoint which we are going to use for our site metadata.

SNAGHTML1b92ddf2
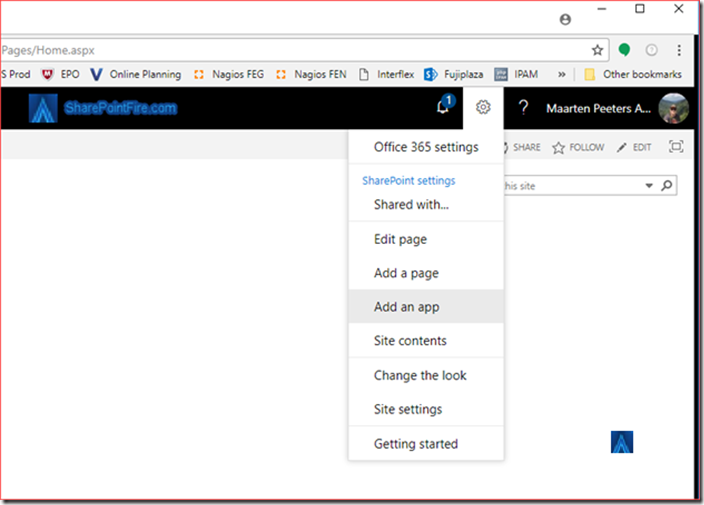
Add an App

image
Custom List

image
Create

image
Add the below columns:

  • SiteURL –> Single line of Text
  • SiteTemplate –> Choice
  • SiteLanguage –> Choice

image

The list has been created which we are going to use for our site provisioning.

Get AppId and AppSecret in SharePoint Online

It is possible to use a username and password for the Azure Function but it is also possible to use an AppId and AppSecret for impersonation.
In this scenario we are going to use an AppId and AppSecret.

Go to the site collection where you want to register the app by appending the url with “_layouts/15/appregnew.aspx”

image
Fill in the above information and click on create

image

Save the Client Id and Secret as we are going to need it for our Azure Function.
Next append /_layouts/appinv.aspx to the url

image
With the below Permission Request XML we allow the app access to the site collection. You can specify different levels which are explained at https://docs.microsoft.com/en-us/sharepoint/dev/sp-add-ins/add-in-permissions-in-sharepoint .

<AppPermissionRequests AllowAppOnlyPolicy=”true”>

<AppPermissionRequest Scope=”http://sharepoint/content/sitecollection” Right=”FullControl” />

</AppPermissionRequests>

and click on Create

image
Trust It

Create Azure Storage Queue

We are going to setup the Azure Storage Queue which will handle all our messages which have been sent using Microsoft Flow.
Please note that this can also be achieved without the Azure Storage Queue as you can directly sent the message to the Azure Function using an Azure HttpTrigger function.

First go to your Azure Dashboard

image
Storage accounts

image
Add

image
Create

image
Open the newly created storage account

image
Click on Queues

image
+ Queue

SNAGHTML1bad6cd5
OK

The Azure Storage Queue has now been created which we use within our Microsoft Flow and Azure Function.

Create Azure Function

The next thing we will build is the Azure Function. The Azure Function will be created based on PowerShell and the SharePointPnPPowerShellOnline module.
We are going to start from the Azure Dashboard.

image
Go to the App Services

image
Add

image
Function App

image
Create

image
We are going to use the existing resource group and storage which we created during the Azure Storage Account. Click on Create

image
Open the newly created Azure Function

image
New function

SNAGHTML1bcaa56d
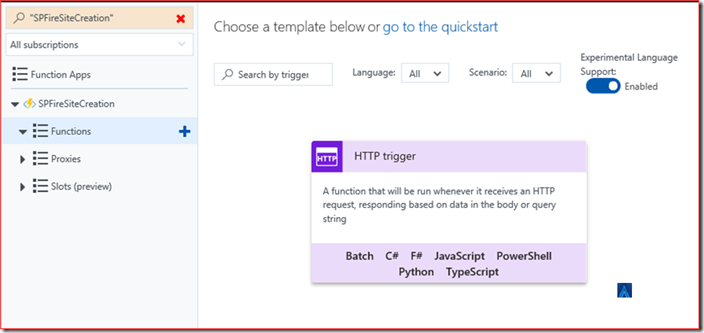
Enable Experimental Language Support and navigate to Queue trigger

image
Click on PowerShell

SNAGHTML1bcdd008
Enter the queue name we created earlier. And click on New

image
Select the Azure Storage Account

image
Create and navigate back to the Platform features

image
Go to Platform features

image
Open Advanced tools (Kudu)

image
Click on Debug Console and then on PowerShell

image
Navigate to Site –> wwwroot –> QueueTriggerPowerShell

image
Create a new folder called “modules”

image
We are going to upload the PowerShell DLL’s which we are going to use here as it is not possible to import-modules from within the Azure Function. You can drag and drop the files to this folder.
The files we need are by default installed in the following location: C:\Program Files\WindowsPowerShell\Modules\SharePointPnPPowerShellOnline

image
Copy the contents from this folder to the Azure Function.
If you are missing this folder; Install this using PowerShell on the workstation with the command: Install-Module SharePointPnPPowerShellOnline

image

Also copy the items from the following locations:

  • C:\Windows\assembly\GAC_MSIL\Microsoft.IdentityModel
  • C:\Windows\Microsoft.NET\assembly\GAC_MSIL\Microsoft.IdentityModel.Extensions

Go back to the function

image
Go to the application settings

image
Select 64-bit and scroll down

image
Add the AppId and AppSecret with the key to the application settings as we can reference to these settings from the Azure Function.
Save the modification and in the next chapter we will create the PowerShell script.

Create PowerShell Script

Go to the QueueTriggerPowerShell in the Azure Function

image

image
Add the below PowerShell code

$requestBody = Get-Content $triggerInput -Raw | ConvertFrom-Json

$ParentSiteUrl = "https://spfire.sharepoint.com/sites/projectsitecreation/"

$WebTemplate = $requestBody.WebTemplate

$SiteTitle = $requestBody.SiteTitle

$SiteDescription = "Site with PowerShell"

$SiteURL = $requestBody.SiteURL

$SiteLanguage = $requestBody.SiteLanguage

$AppId = $env:AppId

$AppSecret = $env:AppSecret

connect-PnPOnline -AppId $AppId -AppSecret $AppSecret -url $ParentSiteUrl

New-PnPWeb -Title $SiteTitle -url $SiteURL -Locale $SiteLanguage -Template $WebTemplate -Description $SiteDescription

Write-Output "PowerShell script processed queue message '$requestBody'"

image
Click on test in the right corner

image
Enter the below Request body

{
“WebTemplate”: “STS#0”,
“SiteTitle”: “TestCreation1”,
“SiteURL”: “TestCreation1”,
“SiteLanguage”: 1033
}

and click on Save and run

image
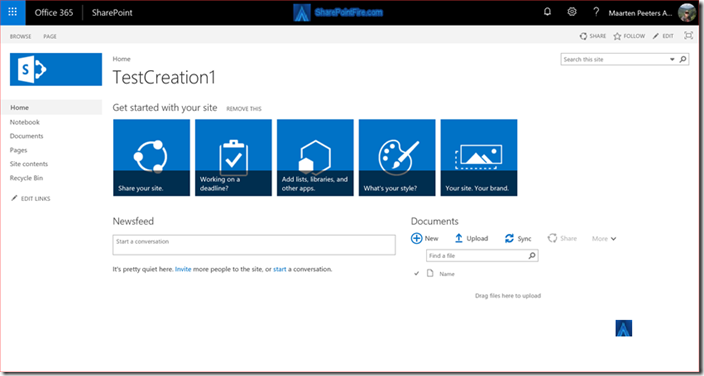
You can verify the log for success and navigate to the created site

SNAGHTML2a2781
We now know that the PowerShell code is successful.

Test Azure Storage Queue

Go to the Azure Storage Queue to test if adding a message is being successfully processed by the Azure Function.

image
Add message

image
OK and you can verify if the Azure function picked up the message if you still have the log open

image
Or go to the newly created site

SNAGHTML302e3a
We confirmed the Azure Storage Queue with the Azure Function is working correctly.

Create Microsoft Flow

We can now create a Microsoft Flow that will add an message in the Azure Storage Queue which will be picked up by our Azure Function.
Go to https://flow.microsoft.com

image
Create from blank

image
When an item is created

image
And add a new step

image
Put a message on a queue

image
Add a new connection if you already had one like me

image
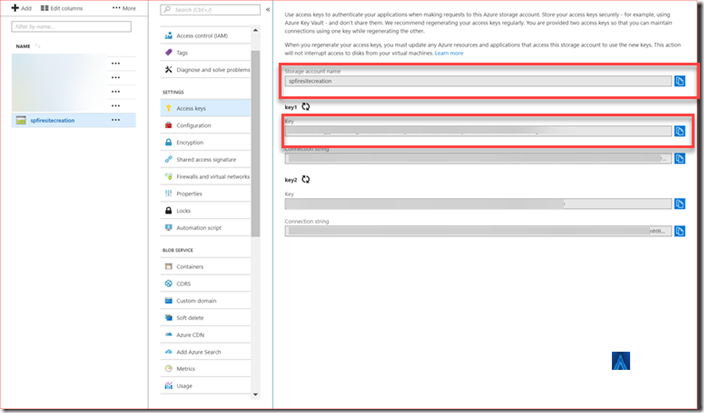
The Connection Name can be anything where the Storage Account Name and Shared Storage Key can be found in Azure

SNAGHTML5123e9

image

Save the flow and create a new item in the previous created SharePoint List

image

Save and first verify the Microsoft Flow

image
Next verify the Azure Function Log if still open

image
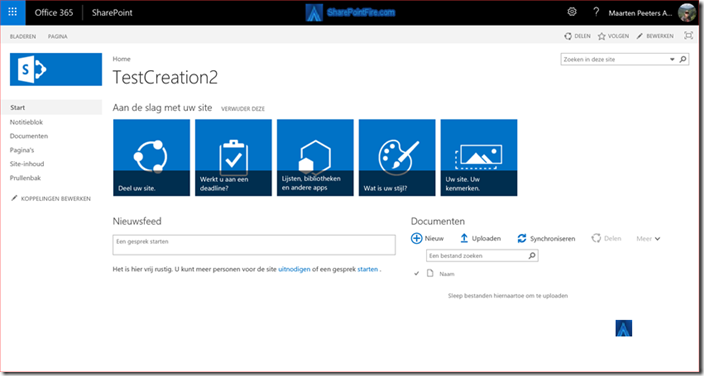
And last verify if the site has been created

SNAGHTML59251b

The site has been created successfully.

Summary

We have now created a working site provisioning solution based on a SharePoint list.
This solution uses multiple techniques such as Microsoft Flow, Azure Storage Queues, Azure Functions and SharePoint Online.
This is just an example of working with these techniques but you can for example do more after the site creation such as adding extra permissions and set default columns.
It is possible to do more with Microsoft Flow as for example send an email after creation or update the status during the creation

You can find more information at https://docs.microsoft.com/en-us/sharepoint/dev/declarative-customization/site-design-pnp-provisioning regarding for example an app ID and app secret with administrative rights on your tenant, Microsoft Flow and an Azure function. Costs for an Azure Function are mentioned in https://azure.microsoft.com/en-us/pricing/details/functions and queue costs at https://azure.microsoft.com/en-us/pricing/details/storage/queues/

Information about the SharePoint PnP PowerShell CmdLets can be found at https://github.com/SharePoint/PnP-PowerShell and https://docs.microsoft.com/en-us/powershell/sharepoint/sharepoint-pnp/sharepoint-pnp-cmdlets?view=sharepoint-ps

Please let me know your use case for Azure Functions and if there are any questions.

The post SharePoint Online site provisioning using Microsoft Flow, Azure Functions and Azure Storage Queue appeared first on SharePoint Fire.

Create SharePoint service accounts with PowerShell

$
0
0

There are a few of these scripts around to create SharePoint service accounts with PowerShell but I decided to create a new one as SharePoint 2019 is coming with a bit more functionality and error handling.
A good blog about the different service accounts needed can be found at https://absolute-sharepoint.com/2017/03/sharepoint-2016-service-accounts-recommendations.html
The general recommendation in this blog is to use different service accounts for each environment which can be easily done with this script.

Using the script

The script needs the activedirectory module to function correctly.
Please install the Active Directory management tools to be able to use this module.
I recommend running this script on the domain controller or a management server with sufficient permissions.

PowerShell Gallery

The script has been uploaded to the PowerShell Gallery.
Start PowerShell as an administrator on a server/computer and run the following command:

Install-Script -Name Add-ServiceAccounts

image_thumb

Press Y if you want to add the default imported scripts location to the PATH environment variable.

image_thumb-1

Press Y to install and import the NuGet provider now as this is a “clean” server installation.

image_thumb2

Press Y to install the scripts from the PSGallery and the script will be saved on the default location C:\Program Files\WindowsPowerShell\Scripts.
I always recommend first reading through the .ps1 file if you haven’t already read it at the PowerShell Gallery page.

You can now run the following command to create the service accounts:

Add-ServiceAccounts -OU "OU=Service Accounts,OU=SPFire,DC=sharepointfire,DC=com" -UPNSuffix "SharePointFire.com" -Prefix "SA_SP2019" -LogPath "C:\Install"

image_thumb3

The service accounts have been created in the specified location

image_thumb4

You can also verify the log file and add the passwords to your password database.

image_thumb5

Copy / Paste

The other option is to just copy and paste the below code in PowerShell as administrator.
Please note that the below script may not be the latest version as the PowerShell Gallery script will always be more updated!
You can add additional users easier this way by simply updating the $Accounts variable with more users.

<#PSScriptInfo .VERSION 2.3 .GUID a8d133a6-dc3b-4dbf-a6f5-1ea8abcbb7bd .AUTHOR Maarten Peeters - SharePointFire - https://sharepointfire.com .COMPANYNAME SharePointFire .COPYRIGHT .TAGS SharePoint, Active Directory, Service Accounts .LICENSEURI .PROJECTURI .ICONURI .EXTERNALMODULEDEPENDENCIES ActiveDirectory .RELEASENOTES Version 1.0: Original published version. Version 2.0: Removed function Version 2.1: Changed Admin to Install Version 2.2: Fixed A positional parameter cannot be found that accepts argument Version 2.3: Fixed A positional parameter cannot be found that accepts argument #> 

<# .SYNOPSIS Simple Function to create needed SharePoint service accounts .DESCRIPTION Simple Function to create needed SharePoint service accounts. Each service account will receive an unique password. .PARAMETER OU Enter the full path to the OU where to add the service accounts. For example: OU=Service Accounts,OU=SPFire,DC=sharepointfire,DC=com .PARAMETER UPNSuffix Enter the UPNSuffix to be used during creation For example: sharepointfire.com .PARAMETER Prefix Specify the prefix to be used for the service accounts. For example: SA_SP2019 which will create service accounts like SA_SP2019Farm and SA_SP2019Install .PARAMETER LogPath Enter the full path to store a .csv file (; delimited) of the created service accounts with their unique password For example: C:\Install .EXAMPLE Add-ServiceAccounts.ps1 -OU "OU=Service Accounts,OU=SPFire,DC=sharepointfire,DC=com" -UPNSuffix "SharePointFire.com" -Prefix "SA_SP2019" -LogPath "C:\Install" .NOTES Version: 2.3 Author: Maarten Peeters Creation Date: 29-07-2018 Purpose/Change: Fast creation of Service Accounts #>

param(
    [Parameter(mandatory=$true)]
    [string] $OU,
    [Parameter(mandatory=$true)]
    [string] $UPNSuffix,
    [Parameter(mandatory=$true)]
    [string] $Prefix,
    [Parameter(mandatory=$true)]
    [string] $LogPath
)

#Array of accounts to be created. Add names if needed as for example Visio Unattented userID
$Accounts = "Install", "Farm", "Services", "Pool", "MySitePool", "Crawl", "Sync", "C2WTS", "SU", "SR"

try{
    #Verify if Active Directory Module is available
    if (Get-Module -ListAvailable -Name activedirectory) {
        #Import Active Directory Module
        import-module activedirectory -ErrorAction SilentlyContinue

        #Verify if the OU exists
        if(get-adorganizationalunit -Filter { DistinguishedName -eq $OU }) {

            #Test if logpath exists
            If(Test-Path $LogPath) { 
                #Loop through all accounts and create them
                foreach($Account in $Accounts){
                    $Password = ([char[]]([char]33..[char]95) + ([char[]]([char]97..[char]126)) + 0..16 | Sort-Object {Get-Random})[0..15] -join ''
                    New-ADUser -Name "$($Prefix)$($Account)" -SamAccountName "$($Prefix)$($Account)" -DisplayName "$($Prefix)$($Account)" -UserPrincipalName "$($Prefix)$($Account)@$($UPNSuffix)" -Path $OU -Enabled $true -ChangePasswordAtLogon $false -PasswordNeverExpires $true -AccountPassword (ConvertTo-SecureString $Password -AsPlainText -force) -PassThru | out-null
                    $Log += "$($Prefix)$($Account);$($Password) `n"
                }
                $Log | out-file -FilePath "$($LogPath)\SharePointAccounts$((get-date).tostring('sshhMMddyyyy')).csv"
                Write-Host "Accounts created and log located on $($LogPath)" -foregroundcolor green
            } Else { 
                Write-Host "The path $($LogPath) could not be found. Please enter a correct path to store the passwords" -foregroundcolor yellow
            }
        }  else  {
            Write-Host "The OU $($OU) could not be found. Please enter a correct OU to store the accounts" -foregroundcolor yellow
        }
    } else {
        Write-Host "Active Directory module not loaded. Please install Active Directory Management Tools" -foregroundcolor yellow
    }
}
catch{
    write-host "Error occurred: $($_.Exception.Message)" -foregroundcolor red
}

SNAGHTML5e4efe7_thumb1

You will need to enter the parameters used for this script.

image_thumb20

And these accounts will also be created correctly

image_thumb10

With their unique passwords

image_thumb11

The post Create SharePoint service accounts with PowerShell appeared first on SharePoint Fire.

Generate a new secure password with PowerShell

$
0
0

The PowerShell Gallery is a perfect solution to store your own scripts which you use on a regular basis where other people can use them to. In this case I added my script to generate a new secure password with PowerShell where you only need to specify the length required. There are a lot of times where you need to create a new password for example the AD recovery password, SharePoint farm passphrase or just for a user account. The password will have uppercase, lowercase and special characters.

The script can be found at  https://www.powershellgallery.com/packages/New-SecurePassword.
I always recommend reading the code first as this is a script from the internet which can be found after clicking on “Show” at “FileList”

image

You can install the script using the below command

Install-Script -Name New-SecurePassword

image

Press Y if you want to install the script from the PSGallery where you can then just enter the following command to generate a new secure password with PowerShell.

New-SecurePassword.ps1 -Length 16

image

The password is readable using Write-Host but also copied directly to the clipboard.

The post Generate a new secure password with PowerShell appeared first on SharePoint Fire.

Collect Office 365, Exchange Online and SharePoint Online data with PowerShell

$
0
0

I’ve created a tool to collect data from Office 365 last year. I decided to create a new one which should be easier to use, easier to expand including the installation of the different required modules. The tool has been created with PowerShell using a WPF user interface. The data collection is being executed in a runspace which makes the GUI responsive during the collection. This tool is just a start to collect Office 365, Exchange Online and SharePoint Online data with PowerShell where I will expand it based on customer requirements. It is possible to create certain checks to for example only list webs with unique permissions or show lists with more then an x number of items.

Please let me know which information you would like to collect and I’ll add it to the tool.
You can follow and download the Collect Office 365, Exchange Online and SharePoint Online data with PowerShell tool at GitHub: https://github.com/peetersm12/Office365Information.

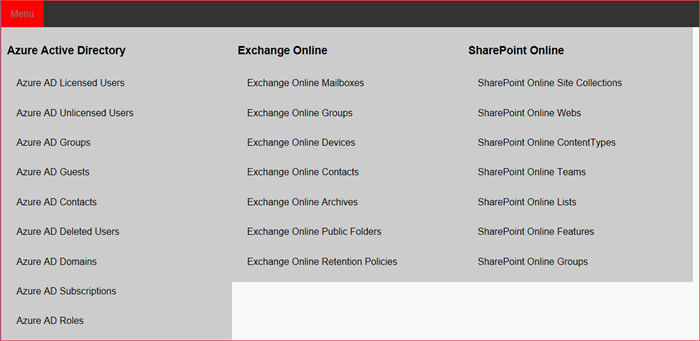
This tool will retrieve the information you would like to get based on the authorization you have. It will collect but is not limited to the following:

Office 365 Exchange Online SharePoint Online
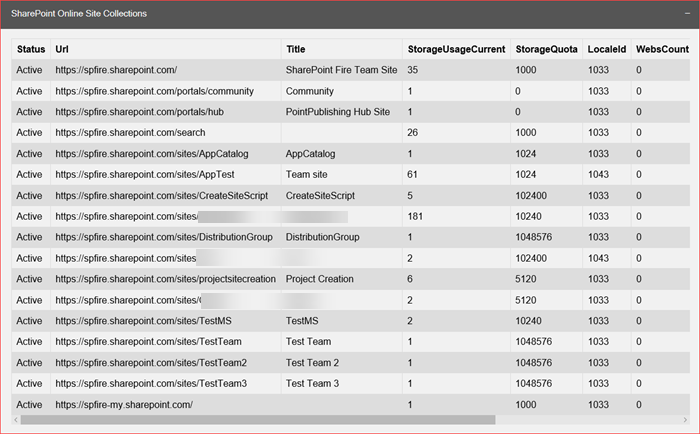
Azure Active Directory Users Exchange Online Mailboxes SharePoint Online Site Collections
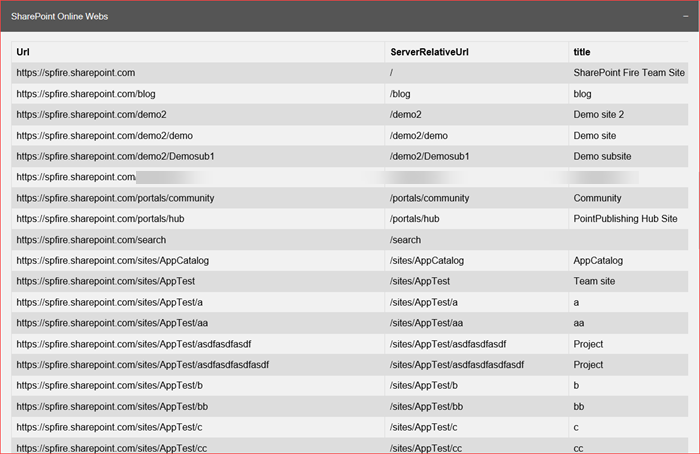
Azure Active Directory Groups Exchange Online Groups SharePoint Online Webs
Azure Active Directory Guests Exchange Online Devices SharePoint Online Content Types
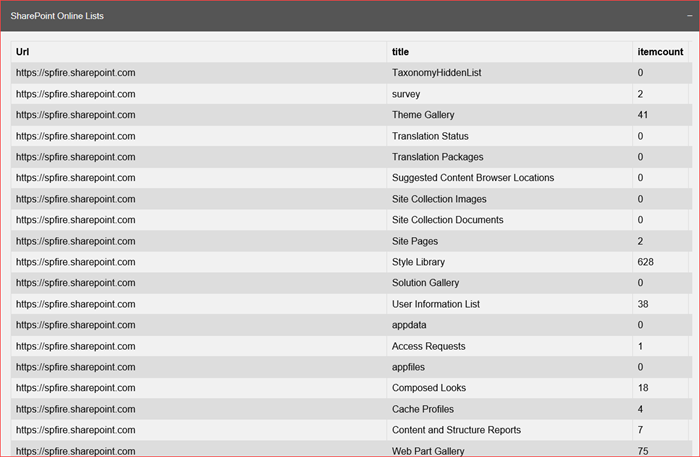
Azure Active Directory Contacts Exchange Online Contacts SharePoint Online Lists
Azure Active Directory Deleted Users Exchange Online Archives SharePoint Online Features
Office 365 Domain information Exchange Online Public Folders SharePoint Online Permissions
Office 365 Subscriptions Exchange Online Retention Policies
Office 365 Roles
Office 365 Teams

image

[How to] Collect Office 365, Exchange Online and SharePoint Online data with PowerShell

First copy all files and folders from the GitHub repository at https://github.com/peetersm12/Office365Information.
I copied the files and folders to a clean Windows 10 image as to test and run the tool for the first time.
It’s a tool with a lot of pre-requisites which may impact the usability of the tool.

image

Run “Office365-Information.ps1” and you will automatically be asked to run as administrator if you ran this as a normal user.
Please note that you may need to change the execution policy.

image

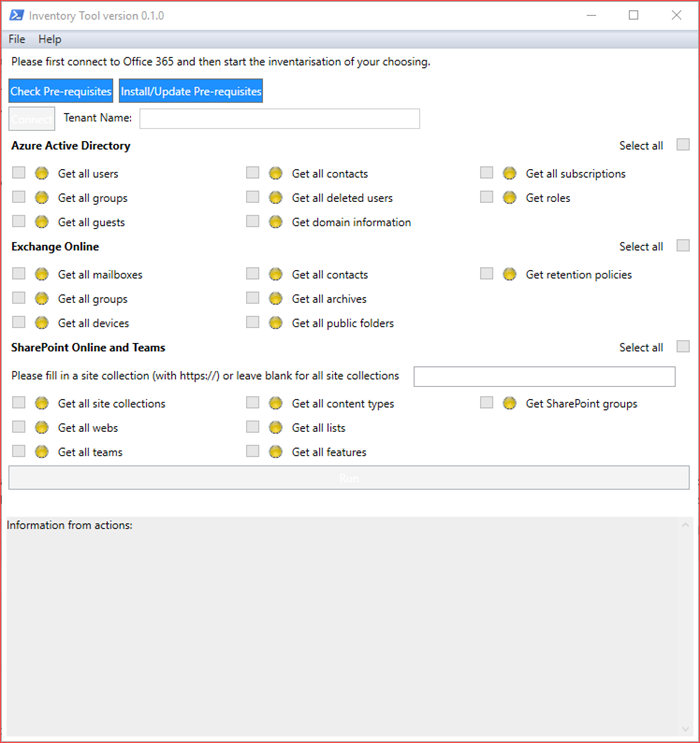
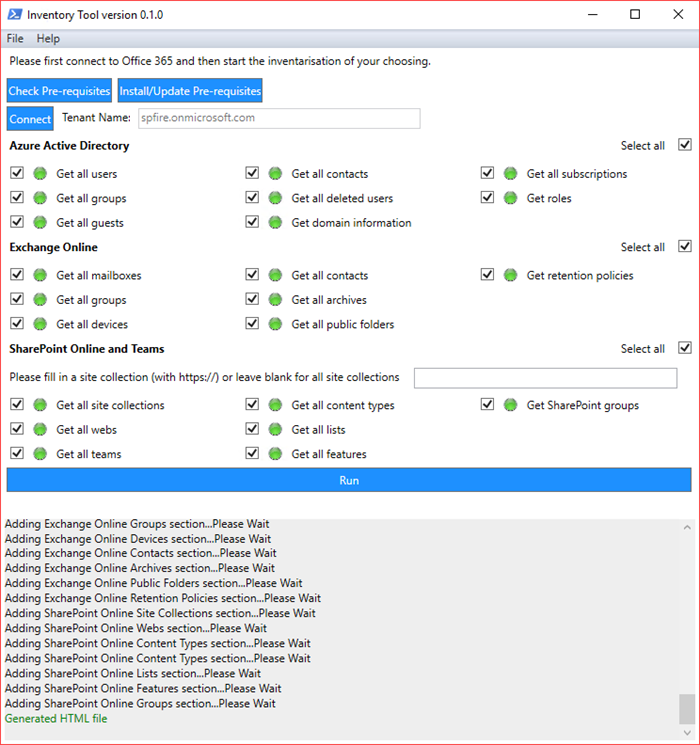
The GUI has started with a PowerShell window in the background.
First click on “Check Pre-requisites” to verify if you are able to use the script.

image

I’m missing a bunch of modules as this is a clean Windows 10 machine.
Next click on “Install/Update Pre-requisites” to download and install the correct modules.
This may break if you have installed very old versions of some modules. Download and update these modules manually should it fail for any reason.
The GUI may freeze during the installation as it’s downloading the .msi from Microsoft.

image

You will need to accept the installation from the PSGallery and Nuget provider a few times which can be done using the PowerShell window in the background.
Continue accepting all questions (take a look at the script to verify what it is installing)
Go back to the GUI to verify the progress

image

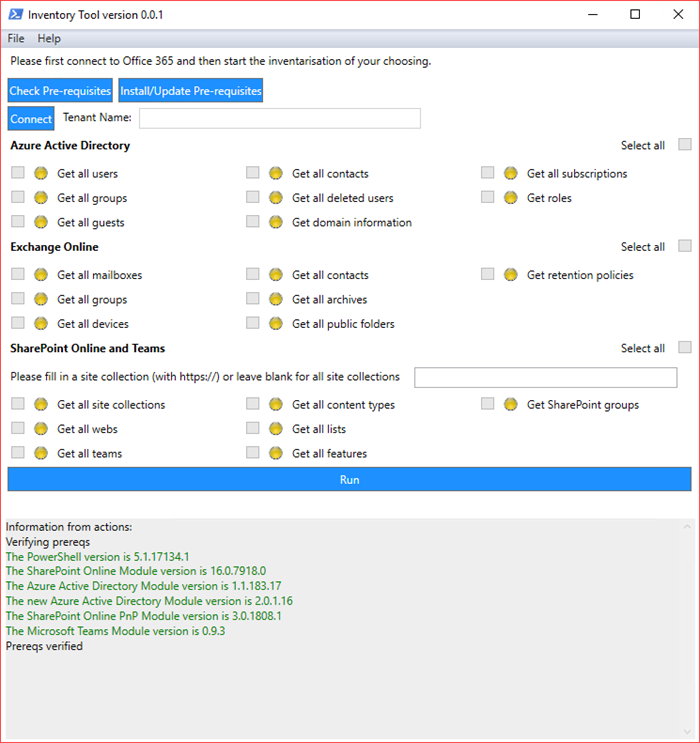
Please restart the script and verify pre-requisites again

image

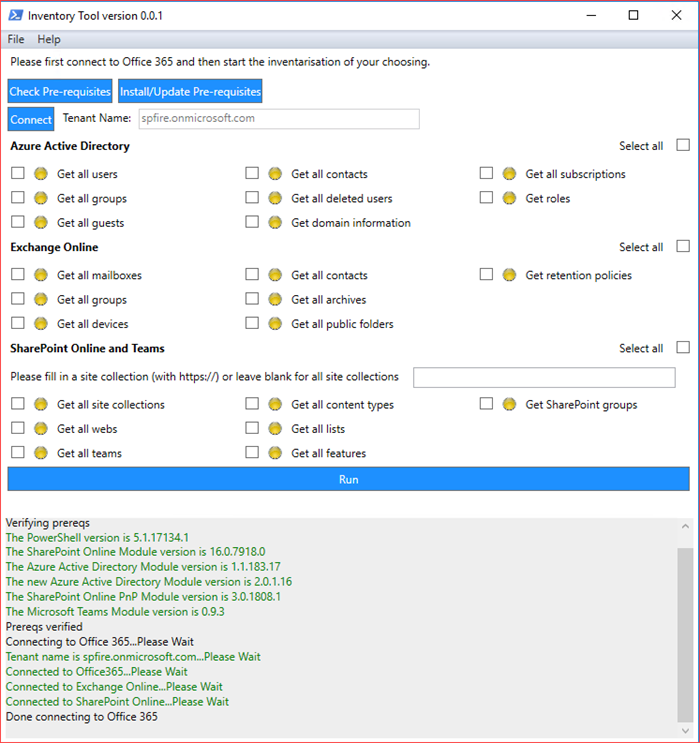
The Connect and Run buttons have become available if all pre-requisites are met.
Please click on “Connect” to enable the checkboxes as it will only enable the checkboxes which you have permissions to.
It will try to connect to the Office 365 tenant, Exchange Online and SharePoint Online which will enable the checkboxes if passed.

image

OK

image

It will list in green if the connection was successful and enable the checkboxes.
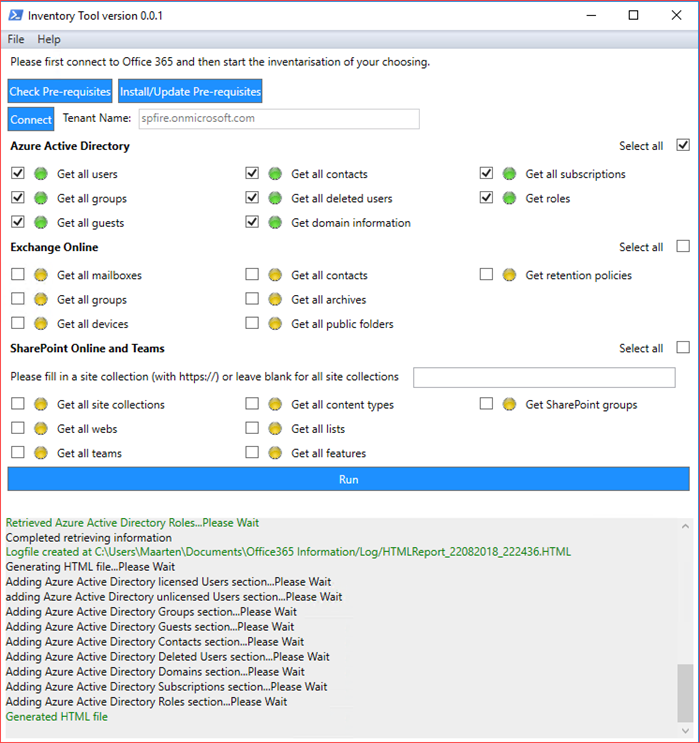
In my first test I have selected all Azure Active Directory checkboxes.

The script will first collect all the requested data and store the information in an .XML file
Next it will create an .HTML file based on the information available in the .XML file.
This means you will only see the sections in the .HTML file of the data you have selected.

image

You can scroll to the log if an error should have occurred.
The .HTML file should have opened automatically but if not it’s located in the log folder.

image

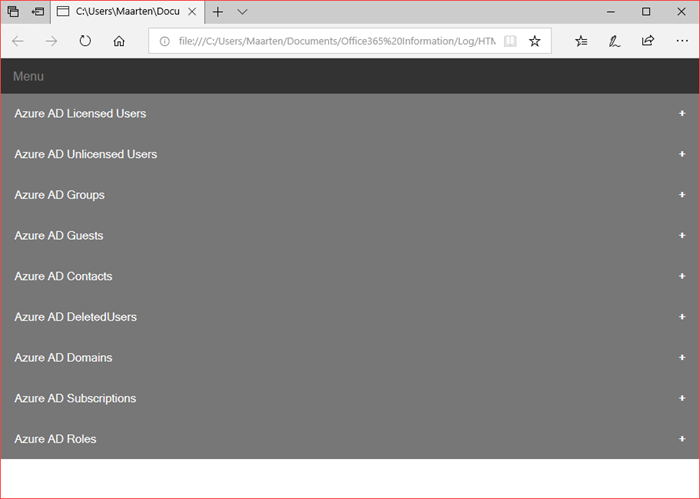
A responsive .HTML file has been created with only the requested sections available.

image

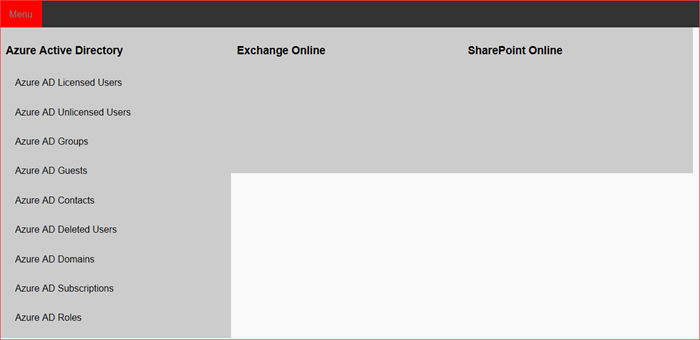
The Menu also only shows the sections you requested.
It’s a one-page site where the menu navigates you to the selected section in the .HTML file.
You can view the information at the end of the blog but for my second test I’m going to select everything and run it again.
Please note that you can collect information from just one SharePoint Online Site Collection or collect information from all Site Collections in your tenant.
It may take a while if you have a large tenant!

image

The HTML file should again be opened automatically which may make the GUI unresponsive.

image

The different outputs are listed below.

Report

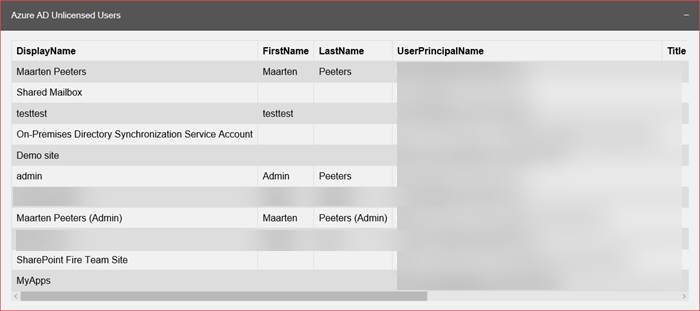
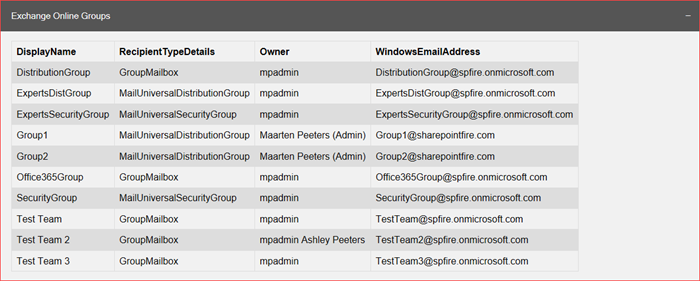
I have copied a few sections from the .HTML file below.
The different tables can be copied to Excel from the .HTML file if you want to sort between the data as I currently haven’t added the functionality to create an .XLSX file directly.

image

image

image

image

image

image

image

image

image

image

image

image

The post Collect Office 365, Exchange Online and SharePoint Online data with PowerShell appeared first on SharePoint Fire.

Settings or services required to complete this request are not currently available.

$
0
0

I received the error “Settings or services required to complete this request are not currently available. Try this operation again later. If the problem persists, contact your administrator.” when trying to configure the App URL’s after a greenfield installation of SharePoint 2019 but this can also occur on SharePoint 2013/2016.

There are a few possible solutions for this error where a reboot of the SharePoint servers is the easiest and quickest.

Verify the below SharePoint services and restart these if started or start these if the above doesn’t resolve the issue.

– Managed Metadata Service Application
– App Management Service Application
– Subscription Service Application

You can restart these with PowerShell. First run the following command in the SharePoint 201X Management Shell

get-spserviceinstance

This will list all services available and their current status. Note the ID and run the following command with the ID of the service:

stop-spserviceinstance “03f17c9b-4f40-45c4-9c7d-4dc9c911d873”
start-spserviceinstance “03f17c9b-4f40-45c4-9c7d-4dc9c911d873”

Grant the service account of the application pool permissions for the App Management and the Subscription Settings Service Application if the above doesn’t resolve the issue by following the below steps:

1. Select the App Management Service Application
2. Click on Permissions and add the application pools service account with full control
3. Select the Subscription Settings Service Application
4. Click on Permissions and add the application pools service account with full control
5. Go back to Apps and verify if you don’t receive the error again.

The post Settings or services required to complete this request are not currently available. appeared first on SharePoint Fire.


Using on-premises data gateway with SharePoint 2019 and Microsoft Flow

$
0
0

I wanted to create a working environment with the on-premises data gateway in combination with SharePoint 2019. The scenario I configured is a simple one as it only sends a mail when a new item has been added to a library in my SharePoint 2019 farm. This scenario would present more possibilities for customers who are using SharePoint on-premises and are looking for a Workflow or PowerApp solution without having to use for example SharePoint Designer.

This post will first describe the installation of the on-premises data gateway and then the creation of the Microsoft Flow using this gateway.

Installing the on-premises data gateway

Information can be found at https://docs.microsoft.com/en-us/power-bi/service-gateway-onprem and you can download the gateway using at https://go.microsoft.com/fwlink/?LinkID=820580&clcid=0x409.
I’ve downloaded the on-premises data gateway and started the installation on a server which also hosts my Azure AD Connect tool.

Click on Next

Install to the default location (or specify a location), accept the terms and use and click on Install

Click on Yes

You will be asked the same question again and also click on Yes

Enter an Email address to use with this gateway and click on Sign in

Connect to you Office 365 Tenant and click on Sign In (Aanmelden)

Give your on-premises data gateway a name and enter a recovery key.
Click on Configure

The gateway should be created successfully and it will register itself as a gateway for your Office 365 tenant.
You can disable helping Microsoft if you like and go to Diagnostics

Start a network ports test by clicking on Start new test

It may take a while but should give the above results.
In my case it completed but failed.
Open the last completed test result.

Everything was successful except the two server names and IP.
This can be at Microsoft’s end or at my end but I decided to not troubleshoot this as it has 31 successful server names.
Now go to https://flow.microsoft.com

Configuring Microsoft Flow Connections

The Gateway should be automatically created for your tenant where you only need to create a connection.
Please go to https://emea.flow.microsoft.com/en-us/pricing/ to verify the available plans and if you can add Gateway Connections as it does not work with the free version or E1 license.

Click on the “Gear” icon and select Connections

Create a new connection

Select SharePoint but you can also use SQL Server or any of the available connections which work with the On-Premises Data Gateway

Select connecting using the on-premises data gateway and scroll down

Enter the credentials for your on-premises environment and select the created gateway.
Note that you can add multiple gateways depending on your flow plan.
Go back to the flows homepage

Creating the Microsoft Flow

Click on My Flows

Create a new Microsoft Flow

Click on Create from blank

Select When a file is created in a folder from the SharePoint available triggers

First select the connection which you are going to use

Enter the Site Address and Folder Id (you can also use the folder viewer to select a folder from your site).
Click on + New step

I’m just going to send an email using the Office 365 Outlook action

It will be sent to my personal mail account with metadata from the SharePoint 2019 library.
First click on Save and then on Test

Save & Test and add a file to your SharePoint 2019 library and wait for the Microsoft Flow to continue

The flow executed successfully and an email has been sent to my mailbox

I have added a new .txt document to verify if it also triggers without testing and this test was also successful

This “simple” scenario shows that you can communicate with your SharePoint On-Premises environment using the on-premises data gateway from Microsoft.
Microsoft Flows are being triggered by the On-Premises environment.
You can now build your complex workflows not using SharePoint Designer but using Microsoft Flow.

The logging from the on-premises data gateway also provides good information regarding your gateway.
I have verified the logs for my environment and can see that Microsoft Flow is actively polling my SharePoint on-premises library for new content.

DM.EnterpriseGateway Information: 0 : 2018-10-02T19:22:55.9955178Z DM.EnterpriseGateway 6d3ce9bd-66b1-4af9-8140-38d010ebc9a1        2e3ae2b3-44d1-49a1-89db-f33e83245d52             MGPP   983aa058-7427-4c1b-97d2-08090368600b    46EFAADE [DM.GatewayCore] Deserialized GatewayHttpWebRequest, executing

DM.EnterpriseGateway Information: 0 : 2018-10-02T19:22:55.9955178Z DM.EnterpriseGateway 4b2ee4e3-e434-4e4b-9f7e-f1e6c837a391              2e3ae2b3-44d1-49a1-89db-f33e83245d52             MWPR  983aa058-7427-4c1b-97d2-08090368600b    2BD360D1 [DM.GatewayCore] Processing http(s) request with URL: http://portal.sharepointfire.com//_api/web/GetFolderByServerRelativeUrl(@p)/Files?$filter=TimeCreated%20ge%20datetime’2018-10-02T19:00:09Z’&$orderby=TimeCreated,Name&@p=’%2fShared+Documents’

DM.EnterpriseGateway Information: 0 : 2018-10-02T19:22:55.9955178Z DM.EnterpriseGateway 4b2ee4e3-e434-4e4b-9f7e-f1e6c837a391              2e3ae2b3-44d1-49a1-89db-f33e83245d52             MWPR  983aa058-7427-4c1b-97d2-08090368600b    BB3A41D3 [DM.GatewayCore] Processing https request

DM.EnterpriseGateway Information: 0 : 2018-10-02T19:22:55.9955178Z DM.EnterpriseGateway 4b2ee4e3-e434-4e4b-9f7e-f1e6c837a391              2e3ae2b3-44d1-49a1-89db-f33e83245d52             MWPR  983aa058-7427-4c1b-97d2-08090368600b    DFE1F964 [DM.GatewayCore] Http(s) request with windows authentication

The post Using on-premises data gateway with SharePoint 2019 and Microsoft Flow appeared first on SharePoint Fire.

Grant user account Farm Administrator permissions with PowerShell

$
0
0

We had an “unexpected” issue at a customer which I troubleshooted. I was unable to connect to the Central Administration and I tried to add my account to the Farm Administrators group using PowerShell as a possible solution. The issue occurred on a SharePoint 2013 environment but the below screenshots have been taken from a SharePoint 2019 environment.

First start the SharePoint 2019 Management Shell as administrator

Use the below commands to retrieve the current Farm Administrators

$WebApp = get-spwebapplication -includecentraladministration | where-object {$_.DisplayName -like "SharePoint Central Administration*"}
$Web = Get-SPweb($WebApp.Url)
$FarmAdminGroup = $Web.SiteGroups["Farm Administrators"]
$FarmAdminGroup.users

Next run the following commands to add the user to the Farm Administrators group.

$user = "Domain\UserID"
$FarmAdminGroup.AddUser($user, "", $user, "")

You can run the following commands again to retrieve the list of current Farm Administrators.

$FarmAdminGroup = $Web.SiteGroups["Farm Administrators"]
$FarmAdminGroup.users

The post Grant user account Farm Administrator permissions with PowerShell appeared first on SharePoint Fire.

Sorry, something went wrong while browsing to the Central Administration: Parameter name: encodedValue

$
0
0

We encountered the “Sorry, something went wrong” while browsing to the Central Administration of a SharePoint 2013 environment. We analyzed the logs using the ULSViewer and found the following errors referenced by the correlation ID.

Application error when access /, Error=Exception of type ‘System.ArgumentException’ was thrown. Parameter name: encodedValue at Microsoft.SharePoint.Administration.Claims.SPClaimEncodingManager.DecodeClaimFromFormsSuffix(String encodedValue)  at Microsoft.SharePoint.Administration.Claims.SPClaimProviderManager.GetProviderUserKey(IClaimsIdentity claimsIdentity, String encodedIdentityClaimSuffix)  at Microsoft.SharePoint.Administration.Claims.SPClaimProviderManager.GetProviderUserKey(String encodedIdentityClaimSuffix)  at Microsoft.SharePoint.ApplicationRuntime.SPHeaderManager.AddIsapiHeaders(HttpContext context, String encodedUrl, NameValueCollection headers)  at Microsoft.SharePoint.ApplicationRuntime.SPRequestModule.PreRequestExecuteAppHandler(Object oSender, EventArgs ea)  at System.Web.HttpApplication.SyncEventExecutionStep.System.Web.HttpApplication.IExecutionStep.Execute()  at System.Web.HttpApplication.ExecuteStep(IExecutionStep step, Boolean& completedSynchronously)

System.ArgumentException: Exception of type ‘System.ArgumentException’ was thrown. Parameter name: encodedValue  at Microsoft.SharePoint.Administration.Claims.SPClaimEncodingManager.DecodeClaimFromFormsSuffix(String encodedValue)  at Microsoft.SharePoint.Administration.Claims.SPClaimProviderManager.GetProviderUserKey(IClaimsIdentity claimsIdentity, String encodedIdentityClaimSuffix)  at Microsoft.SharePoint.Administration.Claims.SPClaimProviderManager.GetProviderUserKey(String encodedIdentityClaimSuffix)  at Microsoft.SharePoint.ApplicationRuntime.SPHeaderManager.AddIsapiHeaders(HttpContext context, String encodedUrl, NameValueCollection headers)  at Microsoft.SharePoint.ApplicationRuntime.SPRequestModule.PreRequestExecuteAppHandler(Object oSender, EventArgs ea)  at System.Web.HttpApplication.SyncEventExecutionStep.System.Web.HttpApplication.IExecutionStep.Execute()  at System.Web.HttpApplication.ExecuteStep(IExecutionStep step, Boolean& completedSynchronously)

Getting Error Message for Exception System.ArgumentException: Exception of type ‘System.ArgumentException’ was thrown. Parameter name: encodedValue  at Microsoft.SharePoint.Administration.Claims.SPClaimEncodingManager.DecodeClaimFromFormsSuffix(String encodedValue)  at Microsoft.SharePoint.Administration.Claims.SPClaimProviderManager.GetProviderUserKey(IClaimsIdentity claimsIdentity, String encodedIdentityClaimSuffix)  at Microsoft.SharePoint.Administration.Claims.SPClaimProviderManager.GetProviderUserKey(String encodedIdentityClaimSuffix)  at Microsoft.SharePoint.ApplicationRuntime.SPHeaderManager.AddIsapiHeaders(HttpContext context, String encodedUrl, NameValueCollection headers)

There are a few blogs regarding this issue on the web which mentions it occurs due to a misconfiguration in FBA (Forms Based Authentication). We do not have FBA enabled for our Central Administration but the error indicates that’s something is wrong with the authentication as it specifies the SPClaimEncodingManager. There are a few possible solutions to fix this issue where number 3 has resolved it for us.

  1. First try to resolve this issue by restarting IIS or the server to verify it doesn’t have something to do with the servers memory or cache as “resetting” the server may sometimes solve the issue.
  2. It may have something to do with the IIS authentication settings for the Central Administration where it should look like the below
  3. In our case it was the way the Central Administration was setup at the customer. The SharePoint Central Administration icon navigates us to http://admin.<domain>.local but the link doesn’t add the port behind the URL where it was configured to 2720 in the Internet Information Services. We were able to connect to http://localhost:2720 and also when we used http://admin.<domain>.local:2720.You can change the Central Administration URL of the icon to match the configured IIS binding by editing the registry. Follow the following steps to modify the correct key:
    – First backup the registry just to be sure
    – Navigate to HKEY_LOCAL_MACHINE -> Software > Microsoft -> Shared Tools -> Web Server Extensions -> 14.0, 15.0 or 16.0 depending on your version -> WSS
    – Change the “CentralAdministrationURL” value to the correct URL

    The icon now redirects to the correct URL:

The post Sorry, something went wrong while browsing to the Central Administration: Parameter name: encodedValue appeared first on SharePoint Fire.

Exclude users from SharePoint search results using crawl rules

$
0
0

We are using the default AD import for an environment to crawl user profiles. The customer requested the ability to exclude some users from the search results. This can be done by changing the search web part to exclude these users or by changing the user profile synchronization or by excluding these profiles using crawl rules. This blog shows you how to exclude users from SharePoint search results using crawl rules.

I’ve 4 accounts at this environment which I can query using the SharePoint Search Query Tool.

You will have to go to the Central Administration and then to the search administration.

Click on “Crawl Rules” under Crawling

Next click on “New Crawl Rule”

Add the correct path which is normally https://<MySitesHostURL>:<PortNumber>/person.aspx[?]accountname=<Domain>%5C<LoginName>
On my test environment this would be: https://mysites.sharepointfire.com:443/person.aspx[?]accountname=spfire%5Cmpadmin

Select “Use regular expressions…” and “Exclude complex URLs…” and click on OK

Next start a full crawl on the content source where you configured the people search (I suggest creating a content source just for the people search) and afterwards the user will be no longer queryable using search which can also be verified in the crawl log.and the SharePoint Search Query Tool

There is also a PowerShell command to create these exclusions automatically based for example on a property from Active Directory which can be found at https://docs.microsoft.com/en-us/powershell/module/sharepoint-server/new-spenterprisesearchcrawlrule?view=sharepoint-ps


The post Exclude users from SharePoint search results using crawl rules appeared first on SharePoint Fire.

Sorry, you don’t have access to this page creating documents in SharePoint

$
0
0

We encountered the issue where people were receiving access denied errors when uploading documents while having contribute permissions for a specific document library. Create a document worked most of the time but access was denied for some tries with the error “Sorry, you don’t have access to this page”

The user clicked on “New document” and was presented with the “Create a new document” pop-up.

The below error occurred after click on OK

The below was available in the ULS Log.

Access Denied. Exception: Access denied., StackTrace:  at Microsoft.SharePoint.Library.SPRequestInternalClass.GetFileAndFolderProperties(String bstrUrl, String bstrStartUrl, ListDocsFlags ListDocsFlags, Boolean bThrowException, Int32& phrStatus, Object& pvarFiles, Object& pvarDirs, UInt32& pdwNumberOfFiles, UInt32& pdwNumberOfDirs)    at Microsoft.SharePoint.Library.SPRequest.GetFileAndFolderProperties(String bstrUrl, String bstrStartUrl, ListDocsFlags ListDocsFlags, Boolean bThrowException, Int32& phrStatus, Object& pvarFiles, Object& pvarDirs, UInt32& pdwNumberOfFiles, UInt32& pdwNumberOfDirs).

Access Denied for <SiteName>/_layouts/15/CreateNewDocument.aspx?id=https://xxxx etc etc

Solution

The user had the permissions to upload documents and create documents given by the members group. This library was setup that users were not able to view other peoples documents. After troubleshooting we found that the document name already existed in the library but the user doesn’t have permissions to view this document metadata and receives the access denied error. The error changes to “Sorry, something went wrong” should the user be able to view the document with an better message saying “A file with the name <DocName> exists.”

The post Sorry, you don’t have access to this page creating documents in SharePoint appeared first on SharePoint Fire.

The OOTB approval workflow could not update the item in SharePoint

$
0
0

We encountered the issue where the OOTB approval workflow stopped with the error message “The workflow could not update the item, possibly because one or more columns for the item require a different type of information”.

There are a few possible solutions for this issue.

  1. Content approval is not configured for the library
  2. The service account used by the workflow is disabled/removed or password expired as the workflow updates the item with this account
    You can republish the worfklow with an account that has sufficient permissions for the library but who is also working.

The previous version of the workflow has been started a few times before we could resolve this issue where you can use the below script to retrieve the items where the previous version of the workflow is current in progress. First find the workflow name by going to the workflow settings on the specific library.

Next run the following script in the SharePoint Management Shell as administrator where you will need to add the web url, list title and previous version date.

$web = get-spweb <SiteUrl>
$list = $web.lists.trygetlist("<ListName>")
$items = $list.Items
Foreach($item in $items){
$workflows = $item.workflows
foreach($workflow in $workflows){
if($workflow.statustext –eq "In Progress" –or $workflow.statustext –eq "Error Occurred"){
$result = $item.workflows.parentassociation
If($result.internalname –like "*Previous Version:9-2-2018 18:46:48*"){
write-host "$($item.name)"
}
}
}
}

and you will receive a list of the items for which this workflow is still “In Progress” or if an “Error Occurred”


The post The OOTB approval workflow could not update the item in SharePoint appeared first on SharePoint Fire.

DestinationType is a duplicate attribute name while editing Nintex Workflow

$
0
0

We encountered an issue where some Nintex Workflow actions weren’t editable anymore. The error was saying “Sorry, something went wrong” while opening for example the “Create item” action and the ULS was saying “DestinationType is a duplicate attribute name”.

The following full message was fount in the ULS logs

System.Xml.XmlException: ‘DestinationType’ is a duplicate attribute name. Line 1, position 163.
at System.Xml.XmlTextReaderImpl.Throw(Exception e)
at System.Xml.XmlTextReaderImpl.AttributeDuplCheck()
at System.Xml.XmlTextReaderImpl.ParseAttributes()
at System.Xml.XmlTextReaderImpl.ParseElement()
at System.Xml.XmlTextReaderImpl.ParseElementContent()
at System.Xml.Linq.XContainer.ReadContentFrom(XmlReader r)
at System.Xml.Linq.XContainer.ReadContentFrom(XmlReader r, LoadOptions o)
at System.Xml.Linq.XDocument.Load(XmlReader reader, LoadOptions options)
at Nintex.Workflow.Activities.Adapters.WssActions.WssActionsFile.GetCoercionsXmlStringForJavaScript()
at Nintex.Workflow.ApplicationPages.Activities.ContextDataLookup.BuildClientScript()
at Nintex.Workflow.ApplicationPages.Activities.ContextDataLookup.Page_Load(Object sender, EventArgs e)
at System.Web.UI.Control.OnLoad(EventArgs e)
at System.Web.UI.Control.LoadRecursive()
at System.Web.UI.Page.ProcessRequestMain(Boolean includeStagesBeforeAsyncPoint, Boolean includeStagesAfterAsyncPoint)

We tried the following things to resolve this issue (with no effect):

  1. IISReset
  2. Restarting the SharePoint Timer Service
  3. Clearing the cache folder
  4. Restart the SharePoint Timer Service

We were only able to edit the action again after restarting all SharePoint servers in the farm.


The post DestinationType is a duplicate attribute name while editing Nintex Workflow appeared first on SharePoint Fire.


Configure SharePoint managed metadata columns using PowerShell CSOM

$
0
0

I received the request from a colleague to create a script that will configure all managed metadata columns in SharePoint Online to allow people to fill in values.
My colleague first tried this using PnP but was unable to configure the necessary property of a managed metadata column.
It is possible to set this property using the client object model (CSOM) in PowerShell.
You will need the SharePoint Online Client Components SDK which you can download at https://www.microsoft.com/en-us/download/confirmation.aspx?id=42038

We first verified that we were able to change this property by using the below script:

$url = "https://<TenantName>.sharepoint.com"
$userName = "admin@<TenantName>.onmicrosoft.com"
$password = Read-Host "Please enter the password for $($userName)" -AsSecureString

Add-Type -Path "C:\Program Files\Common Files\microsoft shared\Web Server Extensions\16\ISAPI\Microsoft.SharePoint.Client.Taxonomy.dll"

$SPOCredentials = New-Object Microsoft.SharePoint.Client.SharePointOnlineCredentials($userName, $password)

$context = New-Object Microsoft.SharePoint.Client.ClientContext($url)
$context.Credentials = $SPOcredentials
$web = $context.Web
$context.Load($web)
$list = $web.lists.GetByTitle("Documenten")
$context.Load($list)
$field = $list.fields.getbytitle("Zoekwoorden")

$context.load($field)
$context.ExecuteQuery()

$taxField = [Microsoft.SharePoint.Client.ClientContext].GetMethod("CastTo").MakeGenericMethod([Microsoft.SharePoint.Client.Taxonomy.TaxonomyField]).Invoke($context, $field)

$taxfield.open = $true
$taxfield.update()

$context.executequery()

Once we retrieved the correct field we had to cast this to a taxonomyField to be able to set the property “Open”.
The next step was to build a script around this that allows us to configure all managed metadata columns on the rootsite and all subsites.
This script has been upload to GitHub: https://github.com/peetersm12/ConfigureManagedMetadaColumnCSOM

The script will loop through all subsites to find the specified column on all the lists and libraries available.
You can first use a “preview” action to find all lists and libraries which have a column with the name you are looking to update.
Then you can update these columns so that users are allowed to fill in values.
Note that you can use this script for all updates for a specific column, just change the part where you  find the above code.

Using the script

Open the .ps1 file and copy the whole content of the file to preload the functions in the SharePoint Online Management Shell as administrator.

Next run 1 of the following commands:

To first list all lists/libraries which currently has the specified column title
set-mmcolumn -Action “Preview”

To update all lists and libraries which has the specified column title
set-mmcolumn -Action “Update”

Running the preview

Run the following command:

set-mmcolumn -Action "Preview"

and answer the following questions 1 by 1

The script will start and the output will be shown on screen, you can also verify the transcript although this isn’t color coded but search for “Found:”

We can see that our column has been found for the library “Documenten” and users are currently not allowed to fill in values.
Next run the script to update these columns.

Running the update

Run the following command:

set-mmcolumn -Action "Update"

and enter the following questions 1 by 1

The script will start and the output will be shown on screen, you can also verify the transcript although this isn’t color coded but search for “Found:”


We can see that our column has been found for the library “Documenten” and the value has been updated from False to true.
Run the preview again to see if all “green lines” are now set to true

The post Configure SharePoint managed metadata columns using PowerShell CSOM appeared first on SharePoint Fire.

Download and synchronize documents from SharePoint using CSOM

$
0
0

I have created a script in 2015 to download all documents from a site collection to a file share or local drive (blogpost) but we now received the request to download and synchronize documents from SharePoint Online. The customer wants to download all documents from one library and keep the documents updated on the file share. SharePoint Online will be the source location where users will be working daily and the file share will be the destination with files max 1 day old. The customer also wanted to use a list field to categorize the documents and place them in folders on the file share. This would make it easier to find the files. I’ve created this script with CSOM using PowerShell for SharePoint Online but it can be also used for SharePoint 2013/2016 and also 2019 with a few modifications.

You can find the full script below where I will break down the script in a few sections to explain it in detail.

function get-SharePointLibraryDocuments{
#Variables
$rootSite = "https://spfiredeveloper.sharepoint.com"
$sourceSite = "https://spfiredeveloper.sharepoint.com/sites/dev/"
$sourceLibrary = "Documents"
$destinationPath = "D:\xxxxxxxxxx\DownloadLibrary\"

#Credentials
$userName = "mpadmin@spfiredeveloper.onmicrosoft.com"
$password = Read-Host "Please enter the password for $($userName)" -AsSecureString
$Credentials = New-Object Microsoft.SharePoint.Client.SharePointOnlineCredentials($userName, $password)

#set the client context
$context = New-Object Microsoft.SharePoint.Client.ClientContext($sourceSite)
$context.credentials = $Credentials

#Retrieve list
$list = $context.web.lists.getbytitle($sourceLibrary)
$context.load($list)
$context.executequery()

#Retrieve all items
$listItems = $list.GetItems([Microsoft.SharePoint.Client.CamlQuery]::CreateAllItemsQuery()) 
$context.load($listItems)
$context.executequery()

foreach($listItem in $listItems) 
{ 
$fileName = $listItem["FileLeafRef"]
$fileUrl = $listItem["FileRef"]
$fileMeta = $listItem["Meta"]
$modified = $listItem["Modified"]
$created = $listItem["Created"]
$sourceItemPath = "$($rootSite)$($fileUrl)"
$destinationFolderPath = "$($destinationPath)$($fileMeta)\"
$destinationItemPath = "$($destinationFolderPath)$($fileName)"

try{
if((Test-Path $destinationFolderPath) -eq 0)
{
mkdir $destinationFolderPath | out-null
}

if((Test-Path $destinationItemPath) -eq 0)
{
try{
$client = New-Object System.Net.WebClient 
$client.Credentials = New-Object Microsoft.SharePoint.Client.SharePointOnlineCredentials($userName, $password)
$client.Headers.Add("X-FORMS_BASED_AUTH_ACCEPTED", "f")
$client.DownloadFile($sourceItemPath, $destinationItemPath)
$client.Dispose()

$file = Get-Item $destinationItemPath
$file.LastWriteTime = $modified
$file.CreationTime = $created

write-host "New document $($destinationItemPath)" -ForegroundColor green
}
catch{
write-host "Error occurred: $($destinationItemPath) - $($_.Exception.Message)" -foregroundcolor red
}
}
else{
try{
$item = get-childitem $destinationItemPath

if ($item.LastWriteTime.ToString("d-M-yyyy hh:mm:ss") -ne $modified.addhours(1).ToString("d-M-yyyy hh:mm:ss")){
$client = New-Object System.Net.WebClient 
$client.Credentials = $Credentials
$client.Headers.Add("X-FORMS_BASED_AUTH_ACCEPTED", "f")
$client.DownloadFile($sourceItemPath, $destinationItemPath)
$client.Dispose()

$file = Get-Item $destinationItemPath
$file.LastWriteTime = $modified

write-host "Overwritten document $($destinationItemPath)" -ForegroundColor green
} 
else{
write-host "Skipped document $($destinationItemPath)" -ForegroundColor yellow
} 
}
catch{
write-host "Error occurred: $($destinationItemPath) - $($_.Exception.Message)" -foregroundcolor red
} 
}
}
catch{
write-host "Error occurred: $($_.Exception.Message)" -foregroundcolor red
}
} 
}

get-SharePointLibraryDocuments

Variables

I’ve hard coded the source and destination in this script as it was only required for one list but you can use a .CSV file if you have multiple sources and destinations. Note that you should keep the last slash or backslash in the string for $sourceSite and $destinationPath.

#Variables
$rootSite = "https://spfiredeveloper.sharepoint.com"
$sourceSite = "https://spfiredeveloper.sharepoint.com/sites/dev/"
$sourceLibrary = "Documents"
$destinationPath = "D:\xxxxxxxxxx\DownloadLibrary\"

Assembly

I’m running the script in the SharePoint Online Management Shell but you may need to add the SharePoint client DLL’s if you want to use this script on-premises.

SharePoint 2013

Add-Type -Path "C:\Program Files\Common Files\Microsoft Shared\Web Server Extensions\15\ISAPI\Microsoft.SharePoint.Client.dll"
Add-Type -Path "C:\Program Files\Common Files\Microsoft Shared\Web Server Extensions\15\ISAPI\Microsoft.SharePoint.Client.Runtime.dll"

SharePoint 2016/2019

Add-Type -Path "C:\Program Files\Common Files\Microsoft Shared\Web Server Extensions\16\ISAPI\Microsoft.SharePoint.Client.dll"
Add-Type -Path "C:\Program Files\Common Files\Microsoft Shared\Web Server Extensions\16\ISAPI\Microsoft.SharePoint.Client.Runtime.dll"

Credentials

The credentials are again hard coded for this blog but we created a secure text file with the username and password on the server which it will use for its daily schedule. The below can be used to test the script.

SharePoint Online

The below needs to be used for SharePoint Online CSOM

#Credentials
$userName = "mpadmin@spfiredeveloper.onmicrosoft.com"
$password = Read-Host "Please enter the password for $($userName)" -AsSecureString
$Credentials = New-Object Microsoft.SharePoint.Client.SharePointOnlineCredentials($userName, $password)

SharePoint On-Premise

The below needs to be used for SharePoint On-premises

#Credentials
$userName = "<Domain>\<LoginName>"
$password = Read-Host "Please enter the password for $($userName)" -AsSecureString
$Credentials = New-Object System.Net.NetworkCredential($userName, $password)

Client Context

Use the following two lines to get the client context

#get the client context
$context = New-Object Microsoft.SharePoint.Client.ClientContext($sourceSite)
$context.credentials = $Credentials

Retrieve the list

First we will retrieve the proper list

#Retrieve list
$list = $context.web.lists.getbytitle($sourceLibrary)
$context.load($list)
$context.executequery()

Retrieve all items

Next we will collect all items present in the list

#Retrieve all items
$listItems = $list.GetItems([Microsoft.SharePoint.Client.CamlQuery]::CreateAllItemsQuery())  
$context.load($listItems)
$context.executequery()

File variables

We are going to use some item properties which we will store in variables directly after the for each. We will also build our source and destinations strings to be used in the next bits.

#file variables
$fileName = $listItem["FileLeafRef"]
$fileUrl = $listItem["FileRef"]
$fileMeta = $listItem["Meta"]
$modified = $listItem["Modified"]
$created = $listItem["Created"]
$sourceItemPath = "$($rootSite)$($fileUrl)"
$destinationFolderPath = "$($destinationPath)$($fileMeta)\"
$destinationItemPath = "$($destinationFolderPath)$($fileName)"

Create folder structure

We have a column “Meta” in our test environment which we use to categorize our items and we will need a folder for each unique “Meta”. The below section will create a folder if it doesn’t exist.

if((Test-Path $destinationFolderPath) -eq 0)
{
mkdir $destinationFolderPath | out-null
}

Download the file and save to the correct location

The below bit of code will first verify if the item does not exist and will then download the file using system.net.webclient which works for SharePoint on premises and SharePoint Online. We will update the last write time and creation time of the item to the same dates known in SharePoint. Otherwise it will have the dates of the download. You can also use the last saved date of the item but it is harder to retrieve this property and this property may have a mismatch with the modified date of SharePoint.

if((Test-Path $destinationItemPath) -eq 0)
{
try{
$client = New-Object System.Net.WebClient 
$client.Credentials = New-Object Microsoft.SharePoint.Client.SharePointOnlineCredentials($userName, $password)
$client.Headers.Add("X-FORMS_BASED_AUTH_ACCEPTED", "f")
$client.DownloadFile($sourceItemPath, $destinationItemPath)
$client.Dispose()</pre>
$file = Get-Item $destinationItemPath
$file.LastWriteTime = $modified
$file.CreationTime = $created

write-host "New document $($destinationItemPath)" -ForegroundColor green
}
catch{
write-host "Error occurred: $($destinationItemPath) - $($_.Exception.Message)" -foregroundcolor red
}
}

Overwrite items

In the next try catch we will verify if the item present is not the same item as currently in SharePoint because we will otherwise use server resources which are unnecessary as we only want to download new items or update current items. Note that I had to add “.addhours(1)” to my modified variable as in my case the time zone wasn’t matching for SharePoint and the file share. This may also be correct or off by 2 hours, but you will notice this when files are being overwritten and not skipped.

if ($item.LastWriteTime.ToString("d-M-yyyy hh:mm:ss") -ne $modified.addhours(1).ToString("d-M-yyyy hh:mm:ss")){
$client = New-Object System.Net.WebClient 
$client.Credentials = $Credentials
$client.Headers.Add("X-FORMS_BASED_AUTH_ACCEPTED", "f")
$client.DownloadFile($sourceItemPath, $destinationItemPath)
$client.Dispose()</pre>
$file = Get-Item $destinationItemPath
$file.LastWriteTime = $modified

write-host "Overwritten document $($destinationItemPath)" -ForegroundColor green
}
else{
write-host "Skipped document $($destinationItemPath)" -ForegroundColor yellow
} 

Using the script

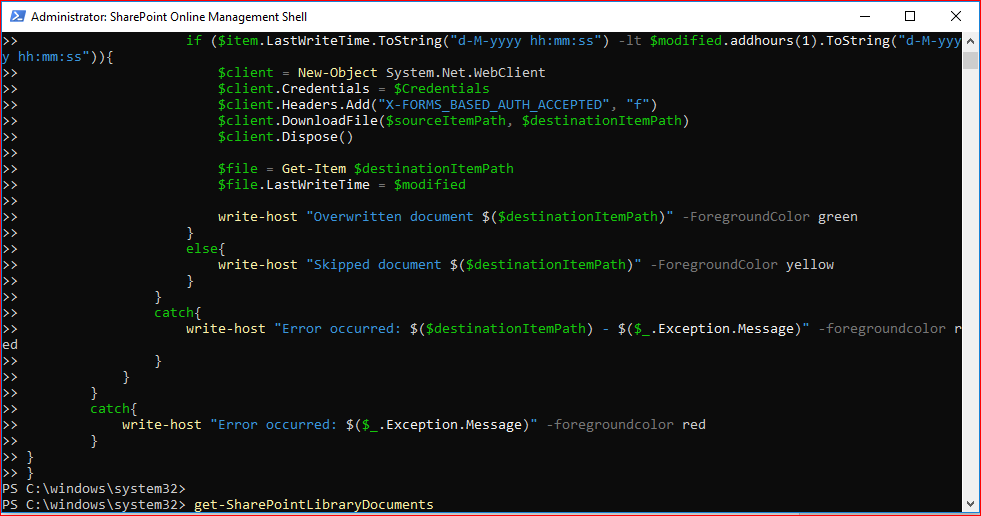
You can update all variables to represent your environment and copy/paste the code in the SharePoint Online Management Shell

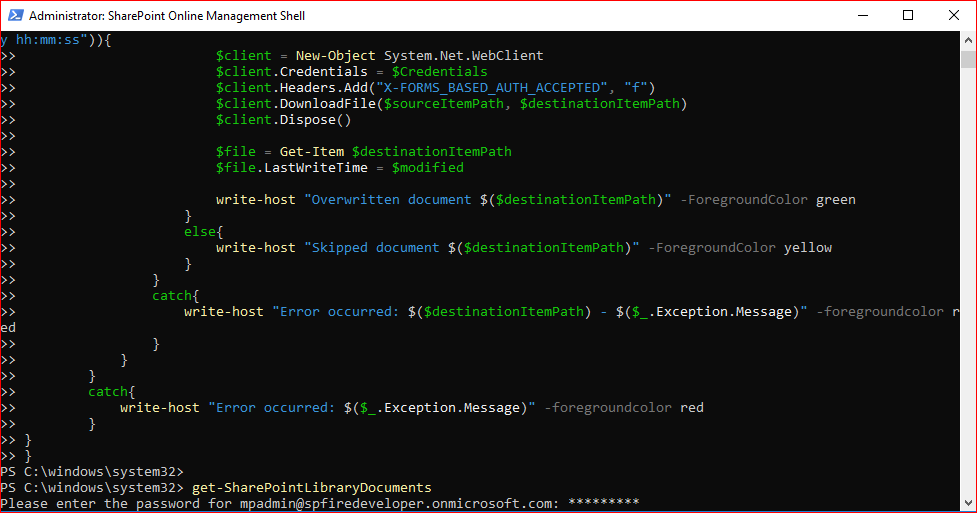
Press enter to run the script and fill in your password

Press enter again and the script will create the necessary folders and download the items

You can run the script again to verify if the items are being skipped

Next I will be updating two items and run the script again


The post Download and synchronize documents from SharePoint using CSOM appeared first on SharePoint Fire.

Get SharePoint Online Lists with more than 5000 items

$
0
0

I’ve created 100 posts in the last few years and this will be me 101st. I’m currently planning on writing a series of posts on retrieving different kinds of information about your SharePoint Online environment and adding these scripts to the PowerShell Gallery. The PowerShell Gallery is a perfect solution to store your own scripts which you use on a regular basis where other people can use them also. The script will be explained on each blog post. In this post we will be retrieving SharePoint Online Lists with more than 5000 items or an amount you specify.

The script can be found at  https://www.powershellgallery.com/packages/Get-ListsWithXAmountOfItems. I always recommend reading the code first as this is a script from the internet which can be found after clicking on “Show” at “FileList”

You can install the script using the below command

Install-Script -Name Get-ListsWithXAmountOfItems


Press Y if you want to install the script from the PSGallery where you can then just enter the following to retrieve SharePoint Online Lists with more than 5000 items.

Get-ListsWithXAmountOfItems.ps1 -web "https://spfire.sharepoint.com" -amount 5000 -logPath "C:/install" -MFA

Note that you can use the -MFA or -ADFS switch if needed.
You can find the log file at the location you specified. Note that I’ve set the amount to 10 in my command to retrieve the most lists.

Script breakdown

I will highlight a few section from the script to describe what it does.

The below tries to find the required modules and will import them if available and otherwise install them. You will still need to accept installing these modules using the PowerShell window!

#Microsoft Online SharePoint PowerShell
$SharePointOnlineModule = Get-Module -ListAvailable "Microsoft.Online.SharePoint.PowerShell"
if(!$SharePointOnlineModule){
Install-Module "Microsoft.Online.SharePoint.PowerShell"
}else{
Import-Module "Microsoft.Online.SharePoint.PowerShell"
}

#SharePoint PNP PowerShell Online
$SharePointPnPPowerShellOnline = Get-Module -ListAvailable "SharePointPnPPowerShellOnline"
if(!$SharePointPnPPowerShellOnline){
Install-Module "SharePointPnPPowerShellOnline"
}else{
Import-Module "SharePointPnPPowerShellOnline"
}

PnPOnline has different ways of connecting to SharePoint Online where you can use a switch parameter to let the script know which authentication method you want to use.

if($MFA){
$context = Connect-PnPOnline -Url $web -UseWebLogin
}elseif($ADFS){
$context = Connect-PnPOnline -Url $web -Credentials (Get-Credential) -UseAdfs
}else{
$context = Connect-PnPOnline -Url $web -Credentials (Get-Credential)
}

The results are being added to a .CSV file which will be created using the below lines of code.
I normally use the get-date with seconds, hours, months, days and years to make it as unique as possible.

$fileName = "Lists$((get-date).tostring('sshhMMddyyyy')).csv"
$file = New-Item -Path $logPath -Name $fileName -ItemType "file"
Add-Content -Path "$($logPath)/$($fileName)" -Value "Site;List;Items"

PnPOnline has the ability to retrieve all sub webs from the root but you won’t index the root site in that case. So I will first retrieve all lists from the specified start location, retrieve the lists from the web and then collect all the items in that list. It will log an entry should the amount be greater or equal to the desired amount.

$rootWeb = Get-PnPWeb
$lists = Get-PnPList -web $rootWeb

write-host "Indexing $($rootWeb.title)" -foregroundcolor green
foreach($list in $lists){
$items = (Get-PnPListItem -List $list -Fields "GUID").FieldValues

if($items.count -ge $amount){
Add-Content -Path "$($logPath)/$($fileName)" -Value "$($rootWeb.title);$($list.title);$($items.count)"
}
}

The same will then be done for the subwebs

$subWebs = Get-PnPSubWebs -Recurse

foreach($subWeb in $subWebs){
write-host "Indexing $($subWeb.title)" -foregroundcolor green
$lists = Get-PnPList -web $subWeb

foreach($list in $lists){
$items = (Get-PnPListItem -List $list -web $subWeb -Fields "GUID" ).FieldValues

if($items.count -ge $amount){
Add-Content -Path "$($logPath)/$($fileName)" -Value "$($subWeb.title);$($list.title);$($items.count)"
}
}
}

The post Get SharePoint Online Lists with more than 5000 items appeared first on SharePoint Fire.

Another way to get the correlation ID information on-premises

$
0
0

SharePoint shows a nice error that something went wrong and provides the end user with a correlation ID. Users will then create a ticket or call you asking to verify what went wrong and you may ask for the correlation ID. If the users provides all the information you already have the timestamp but not the server where the issue occurred as you may have multiple servers in your farm. There are already two PowerShell cmdlets which we can use to search in log files. We can use Get-SPLogEvent when we know on which server the error occurred on to retrieve the different messages. We can also use Merge-SPLogFile which will search the ULS on all servers for a specific time period or also based on the correlation ID.

The below function is a variation of the Merge-SPLogFile script where it will look for the specific correlation ID in each ULS log file it finds in your SharePoint server farm. The below function just needs the log directory (which needs to be on the same location for all servers) and the correlation ID. It will then try to read all the ULS log files for all servers and find the correlation ID you specified. If this doesn’t provide you with more information you at least have the server on which the issue occurred and can open the ULS log file to investigate further.

Function Get-CorrelationLinesFromULS ($LogDirectory, $CorrelationID){
    if ( (Get-PSSnapin -Name microsoft.sharepoint.powershell -EA "SilentlyContinue") -eq $null )
    {
        Add-PsSnapin microsoft.sharepoint.powershell
    }
    
    $SPServers = get-spserver | ? { $_.Role -ne "Invalid"}
    $UNCPath = "$(($LogDirectory).Replace(':','$'))"
    $lines = @()
    $lines += "Timestamp              	Process                                 	TID   	Area                          	Category                      	EventID	Level     	Message 	Correlation"

    foreach ($SPServer in $SPServers)
    {
        try{
            $ServerUNCPath = "\\$($SPServer.name)\$($UNCPath)"
            write-host -f Cyan "Reading the log directory $($ServerUNCPath) on $($SPServer.name)..."

            foreach($file in (Get-ChildItem $ServerUNCPath | Sort-Object LastWriteTime -Descending | Where-Object{$_.name -like "$($SPServer.name)*"})){
                
                write-host -f Gray "Reading file $($file) and looking for $($CorrelationID)..."
                Get-Content "$($ServerUNCPath)\$($file)" | Where-Object {$_ -match $CorrelationID} | ForEach-Object {
                    write-host $_
                    $lines += $_
                }
            }
        }
        catch{
            write-host -f red "Error occurred clearing the configuration cache on $($SPServer.name);$($_.Exception.Message)..."
        }
    }

    return $lines
}

First start PowerShell as administrator on a server in the farm.

Then copy and paste the above code to the PowerShell Window to load the function

Then use the following command to start the search

$output = get-CorrelationLinesFromULS -LogDirectory "D:\SharePoint\Logs\Diagnostic" -CorrelationID "165fc49e-08e2-f084-a3e2-3f0b1bee4369"

You will have a variable $output which contains the found lines. This can be outputted in the PowerShell window directly or use | out-file “Location”\”filename”.log. This log file can be opened again with the ULS viewer to have a better view of the file.

The post Another way to get the correlation ID information on-premises appeared first on SharePoint Fire.

Get SharePoint on-premises workflow ‘last modified by’ using PowerShell

$
0
0

Each workflow has an author which is the person who last modified the workflow. Some third party products like Nintex allow you to configure the workflow to run as the workflow owner. The workflow owner is the person who last modified (published) the workflow. Deleting this account will result in issues for these workflows as actions will no longer be working. The below script will look through the site collection you specify for any associated workflows. You should run the below script for each site collection (or loop through all site collections) to list the current owner of the last published workflow. The script can also be used to just list all workflows currently in a site collection for migration purposes.

Please change the site collection URL before running the script.

You can go to this blog if you want to run the same script (but using CSOM) on your SharePoint Online environment.

#Add sharepoint pssnapin
if ( (Get-PSSnapin -Name microsoft.sharepoint.powershell -EA "SilentlyContinue") -eq $null )
{
    Add-PsSnapin microsoft.sharepoint.powershell
}

$WorkflowDetails=@()

$SiteCollection = get-spsite "Site Collection URL"
$webs = $SiteCollection.allwebs

foreach($web in $webs){
    $lists = $web.lists

    foreach($list in $lists){
        $wfs = $list.workflowassociations

        foreach($wf in $wfs){
            if($wf.name -notlike "*Previous Version*"){
                $authorID = $wf.author

                try{
                    $author = $web.SiteUsers.GetByID($authorID)

                    $row=new-object PSObject
                    add-Member -inputObject $row -memberType NoteProperty -name "SiteURL" -Value $web.Url
                    add-Member -inputObject $row -memberType NoteProperty -name "ListTitle" -Value $list.Title
                    add-Member -inputObject $row -memberType NoteProperty -name "WorkflowName" -Value $wf.Name
                    add-Member -inputObject $row -memberType NoteProperty -name "WorkflowOwner" -Value $author.userLogin
                    $WorkflowDetails+=$row
                }
                catch{
                    $row=new-object PSObject
                    add-Member -inputObject $row -memberType NoteProperty -name "SiteURL" -Value $web.Url
                    add-Member -inputObject $row -memberType NoteProperty -name "ListTitle" -Value $list.Title
                    add-Member -inputObject $row -memberType NoteProperty -name "WorkflowName" -Value $wf.Name
                    add-Member -inputObject $row -memberType NoteProperty -name "WorkflowOwner" -Value $authorID
                    $WorkflowDetails+=$row
                }
            }
        }
    }
}
$WorkflowDetails

Run PowerShell as administrator on a server in the SharePoint farm

Next copy and paste the above script after you have changed the site collection URL to the PowerShell window.

The WorkflowOwner property is the one you should change if an account you are preparing to delete is mentioned here.

The post Get SharePoint on-premises workflow ‘last modified by’ using PowerShell appeared first on SharePoint Fire.

Viewing all 72 articles
Browse latest View live